今回の記事の目的はProcessingの「createImage()」を理解し、自分なりに使ってみること。
この記事を書いた人

上達の研究家 / アーティスト
「才能」ではなく「発見」で描く。文系・36歳からの上達ハック。
- ゼロから独学でクリエイティブコーディングに挑戦し、以下の実績を達成
- 開始1年8ヶ月目までに公募6つに挑戦し、3つ入選(勝率50%)
- KITTE大阪の18メートルあるAxCROSS大型スクリーン
- 虎ノ門ヒルズステーションタワーB2F TOKYO NODE エントランスサイネージで展示
- UN:O(東京大手町)にある会員限定のサテライトオフィスにて2作品常設展示
- 開始1年9ヶ月目に、虎ノ門ヒルズ49階、地上250mのインフィニティプールへ作品提供・展示
- 開始1年8ヶ月目までに公募6つに挑戦し、3つ入選(勝率50%)
- 【上達の秘密】
- 思考の技術:「上達」をシステム化する、モレスキン6冊の運用設計図
- ※虎ノ門ヒルズでの実績を出した「思考」と「経験」を、再現可能な形に体系化
- 思考の技術:「上達」をシステム化する、モレスキン6冊の運用設計図
目次
【Processing】createImage()について
createImage()について
- createImageは英語で「画像を作る」という意味
createImage()は、コンピュータープログラムを使って新しい画像を作るための命令です。この命令を使うことで、プログラム内で画像を描いたり操作したりできます
【Processing】createImage()の使い方【画像とコード】
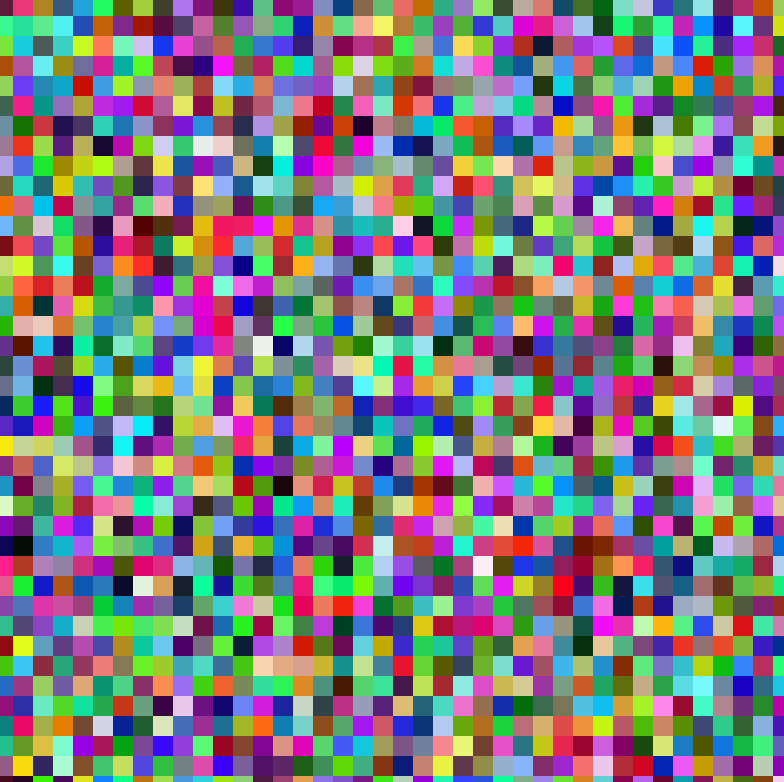
size(400, 400); // ウィンドウのサイズを設定
PImage img;
img = createImage(400, 400, RGB);
img.loadPixels();
for (int y = 0; y < 400; y += 10) { // ドットの間隔を10ピクセルに設定
  for (int x = 0; x < 400; x += 10) {
    int c = color(random(255), random(255), random(255)); // ランダムな色を生成
    for (int dy = 0; dy < 10; dy++) { // ドットの高さを10ピクセルに設定
      for (int dx = 0; dx < 10; dx++) { // ドットの幅を10ピクセルに設定
        img.pixels[(x + dx) + (y + dy) * img.width] = c;
      }
    }
  }
}
img.updatePixels();
image(img, 0, 0, width, height); // ウィンドウ全体に画像を表示【Processing】createImage()を使ってみた感想
createImage()で作成したものは画像として扱われると分かった。
応用したい表現である。
それでは今日もレッツワクワクコーディング。